
Weight and BalanceThere are lots of web pages and articles about weight and balance. Most of them have the same information. Determining the center of gravity isn’t a hard process, it really only takes an hour or so to do the initial weighing and measuring, then a little bit of time at the computer and you are done. I’ll walk you through what I did, and throw a few pointers in along the way. Tools Required Of course you will need some scales to do the weighing part of your weight and balance process. You can use the fancy (expensive) scale sets made just for aircraft, or a bathroom scale that can handle the weight of the airplane. There is no regulation requiring a certified scale, even to weigh a certified aircraft. As long as you or the mechanic performing the weight and balance are confidant in the accuracy of the scale, it is legal. If you can get one, a scale set makes weighing a lot easier and quicker. If you can’t get your hands on one though, you can use any scale or combination.
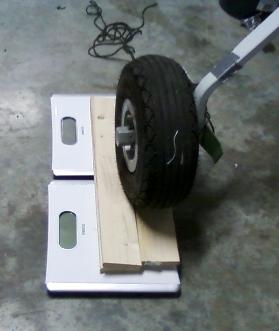
If you don’t have a single scale capable of measuring one of your gear, you can use two scales with a board between them, so each carries half the weight. This is what I did to get my measurements. You will also need a plumb bob and a tape measure. A large t-square comes in handy too. Prep work Start by getting your plane loaded correctly. This means remove all the usable fuel and anything extra in the cockpit that isn’t part of the required equipment list. Then make sure you have everything installed. You need to have all the inspection panels and screws back on before weighing. You also need to have oil, brake fluid, and any other liquids required for flight. Next get together the blocks you will need to keep the plane from rolling, and if required, to lift the tail to a level flight attitude. Don’t worry about weighing them yet, You can do that after you figure out exactly what you will be using. Weighing Objective: Measure the weight of the aircraft on each gear. The total of these weights is the total aircraft weight, with the aircraft in level flight attitude. The first part of the weight and balance process is weighing. If you have multiple scales, roll the plane onto them, making sure it is a level flight attitude, and take the readings. If you have only one scale, it is a little harder. You have to roll one main onto the scale, then block the other wheel up to get level across the main spar, then adjust the tail for level flight. Step two is to repeat this process for the other main. Finally you can use the scale to measure the tail or nose gear. After you have the weight of the plane, make sure to record the weights of the blocks you had on top of the scale too. This is called tare weight, and you will have to subtract it from the final readings to get the real weight of the plane. Weighing tips If you are off just a little from level flight, you can let air out of the tires, or pump them a little fuller as required to get level. Put as many of the leveling blocks as you can under the scales. This makes figuring out the actual weights easier. For me, I had to jack the tail up to level. So I put the blocks on the floor, then put the scale on top of them, then finally the tail. Measuring the plane Objective: Measure the distance from the manufacturer's defined datum line to the center of each gear, with the aircraft in level flight attitude. Each of these distances is called a "moment arm", or sometimes just "arm". The second part of the weight and balance process, after weighing, is measuring. This part is a little trickier. You will have to check the builder’s or maintenance manual to see if there are any special instructions for measuring your plane. But you might as well do the measuring while you have the plane in the flight attitude for weighing.
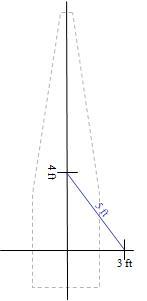
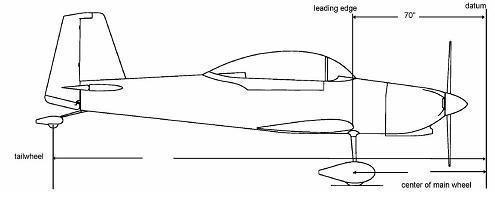
All of the measurements will be taken from an arbitrary datum line--again, you will have to check the manual to see where that is for your plane. For me it is measured 70 inches forward of the leading edge of the wing to a point in front of the spinner. By using a point in front of the airplane, it makes the math a lot easier, but may make taking the measurements a little harder. Measuring tips Before we start, here are a couple of tips that will make it a lot easier: Use the plumb bob to transfer locations to the floor, and mark them with a pen. Don’t try to measure on the airplane itself; it will be way too inaccurate. Mark the tires and floor to ensure nothing moves while you are making your measurements. Make sure you measure parallel to the longitudinal axes of the airplane to get those moment arms. Here is where that large t-square is helpful. I dropped a plumb line from the front center of the longitudinal axis and marked the floor, then repeated the process for the rear. Next I snapped a chalk line between the two marks. This gave me a reference line to ensure I was square and correct when making the other measurements. Measurement Points  Once you have the longitudinal axis line marked on the floor, it is time to get the other measurements needed for your weight and balance. These should include measurements to the nose or tail wheel, the mains, and any extra measurements you will need. Because my datum is located forward of the wing leading edge, I needed to mark that also. I dropped a plumb bob down the leading edge of both wings, marked the floor, and connected the two dots. I ensured this line was square to the longitudinal axes line with the large T-square and also the 3,4,5 method (measure three feet down one line, four feet down the other—the distance between the two marks should be five feet on the hypotenuse).
I then dropped plum lines from the mains and repeated the checks to
ensure square. Last I dropped the line for the tail wheel. With all of these points marked on the floor, it is now an easy matter to measure along the longitudinal axes line to get the distances from the leading edge marks to the mains and to the tail wheel. Moment Arms You can now measure and compute the moment arms for your mains and nose/tail wheel by adding or subtracting the measurements in reference to the datum line. Since my datum line is in front of the nose, measured from the leading edge of the wing, I had to take the measurement from the leading edge mark to the tail wheel mark and add that to the 70 inches that Vans used for the datum.
Datum: 70 inches in front of leading edge Calculations Objective: Find the Center of Gravity (CG), as a measurement from the datum, or another moment arm. Calculating the Center of Gravity is the third and final step in the weight and balance process. Now that you have all the measurements, you are ready to figure out the center of gravity. You can compute the empty CG by multiplying the moment arms for the three wheels with their weights. Each of these multiplications produces a "moment". Then divide the total moments by the total weight to get CG. Here is an example: Aircraft Weight and Balance
Hopefully the CG is inside the range approved for your airplane. If not, you will have to add some weight. If for example, you have an aft CG, you will want to add weight as far forward as possible to get back into CG with the smallest weight penalty. You don’t have to re-weigh the plane to figure this out. You can figure out the arm for a point well forward (say the firewall) and calculate the weight needed there. Just add a row to the above table and you can gradually add weight until you get inside CG. For example, if I needed the CG to be 77.5, and the firewall had an arm of 35, I would use the below table and add weight to the firewall until I got the bottom CG under 77.5.
It took me 4 tries to get it right. I used 10, 20, 30, 25 and finally 26 lbs to get:
Finally, to get ready for the initial inspection, you will have to compute a few sample weight and balance numbers. My DAR wanted to see max fwd CG, max weight CG, and normal ops. To get max fwd CG for the RV-8, I had to use the max weight in the front baggage compartment, pilot and no fuel. To get max weight CG, I used 170 lbs pilot, 260 lbs rear seat, 50 lbs front baggage and 8 lbs rear baggage floor. I computed full fuel and no fuel. The no fuel put me right at the aft CG limit, and I still never got to max gross weight even with full fuel. For more on weight and balance, look at FAA-H-8083-1A, the 97 page FAA Aircraft Weight and Balance Handbook (Adobe pdf file).
Return from Weight and Balance to Experimental Aircraft Paperwork Return from Weight and Balance to Kit Plane Advice Home |

