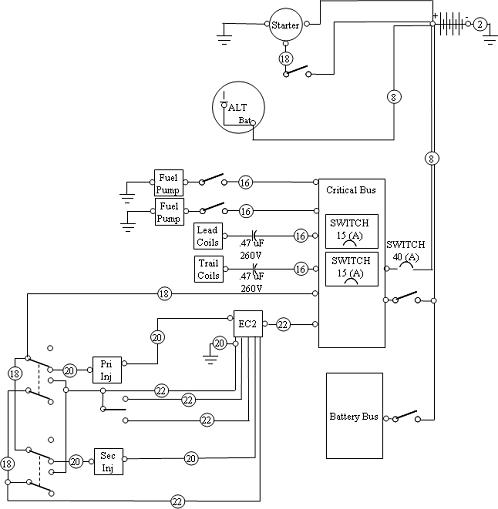

Start Your Aircraft Electrical Construction Off RightFollow this aircraft electrical construction process for success with your kitplane. Start by deciding on all the electrical components you will use. You don’t necessarily have to buy them yet, but you will need the schematics or wiring diagrams to continue. You can get most of these from the manufacturer’s web site. Planning it all outThis is the place to spend the extra time figuring everything out. The extra time spent answering all the questions will save you from cutting extra holes, pulling the wrong wires, or running out of parts before you are finished. You will need to collect all the aircraft electrical schematics from everything you are installing. Vans suggests drawing it on the back of their electrical schematic. I drew mine on PowerPoint, so I could make changes as I added the items. I think I must have gone through four or five revisions until I was happy. I didn’t want to have to keep re-drawing all the time, so I used the computer. I drew every wire, switch and electronic device. I didn’t try to re-draw what I already had on the schematics from the manufacturer. For example, I put the power lines from my battery, through the circuit breaker, to the switch and to the autopilot. But I didn’t draw all the wires from the back of the autopilot to the servos, these were clear enough on the manufacturer's drawing. Here's what I came up with:
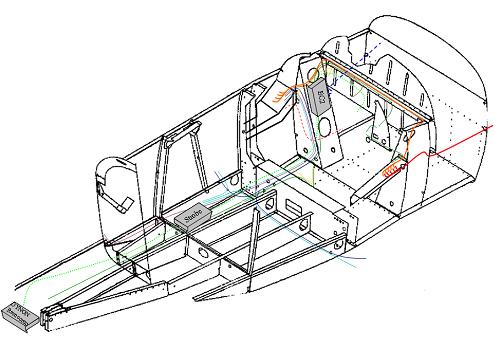
Decide where components will be located It is important to do this now so you can figure out the lengths of all the wires you will be running. You may need to build brackets for some of the aircraft electrical components (as I did with Strobes and Remote Compass.) Make sure the component won’t interfere with other parts of the plane, is oriented correctly, and has enough support from aircraft structure. Draw out the wire routing I scanned the isometric view labeled “RV-8 AFT MOUNTED BATTERY CONFIGURATION” from Plans sheet OP-10. I erased the parts I didn’t want and used it to help figure out where to route all my wires. For the most part, my wires run from the front right firewall where my battery is located, to the circuit breakers on the F-8101 right console. Then forward into the right gear box, across the F-802T L.G. box upper brace, into the left gear box and to the switches on the throttle quadrant. From there they run through the left gear box, under the F-881PP-L mid cabin cover, through the main wing spar, and back the left side of the aircraft. Here's my isometric diagram:
If I were doing my airplane again, I would wire my instrument panel differently. Read here how I would run all aircraft electrical wiring to a Wiring Panel. Measure distances Now that you know where all of your aircraft electrical components are going, you can measure how long each wire will need to be. I took the schematic and went one wire at a time. I measured how long it would need to be, and wrote it down on the schematic next to the wire. Then I was able to use the chart on page 5-20 of the plans, and the manufacturer’s recommendations, to determine wire sizes. I marked these on the schematic too. Buy parts Now you are ready to buy all the aircraft electrical parts and wire you will need. If you have made a comprehensive schematic you can probably get it down to the exact number of each fastener. I ended up buying Van's wiring kit ES EWC-KIT and extra parts from either Vans or Aircraft Spruce. I did a lot of looking and price comparisons, but in the small quantities I was buying, the extra shipping costs outweighed the savings. Cut holes Since you know the gauge and number of wires running through each bulkhead, you are ready to start drilling holes. I stuck with Van's suggestions on where to drill. See bottom of gear box and aft end of main spar for the only two difficult spots I had. Run tubing, grommets, etc I used the Vans Nylon Wiring Conduit inside both wings, through the main spar, and down the fuselage. For the smaller holes I used rubber and plastic grommets, and for the larger holes I used cat tracks. Before I ran any wires, I passed string through the conduit. Then, when I was pulling wire, I taped it and another piece of string to the original string. Then I pulled it all through. This made it easy to pull the wire, and also gave me a new piece of string to pull the next wire. Time to start pulling wires and connecting your aircraft electrical components up. When pulling through the conduit, I suggest pulling the longest wires first, then finishing up with the shorter ones (see Helpful Hints for more on Pulling Wires). I started by pulling the tail light and pitch trim wires and ended with the wing lights. Use only good quality ratcheting crimpers to finish the connectors. (See Tools). Tracing electrical shorts is a pain, especially if they are intermittent. You don’t want all your work ruined by poor quality crimps that fail after a short time. Along the same line, if the wires aren’t marked, tracing them is tough. See Permanent Labeling for how I would do it. Testing Don’t use a trickle charger to test avionics and other complicated aircraft electrical components. It may ruin the circuits. Use a spare battery or power supply. Make sure it is giving enough power to run the circuit before you decide that the circuit is wired incorrectly. Not enough power may lead you to believe something is wired incorrectly. I thought my power supply was large enough to run the autopilot servos. When they just clicked at me, and didn’t work, I thought I had wired them wrong. I hooked them up to a battery and voila, everything was correct. I checked each circuit as I wired it, while I was familiar with where I was working, which tools fit, and how I had to lie, crawl or reach to get to it. This process of planning, drawing, measuring, installing, and testing my aircraft electrical systems worked very well for me. Everything worked right the first time! I think it will work well for you, too.
Return from Aircraft Electrical Construction Process to Electrical System Return from Aircraft Electrical Construction Process to Kit Plane Advice Home |

